Following on from the last blog entry, we played a huge game on the second day of CANCON 2013. Continuing our fictional Cold War conflict in 1985, this was to be an attack by the Soviet 8th Guards Army against the US 3rd Mechanized Division. Luckily I took plenty more photos of this game than the one the day before...
The scenario followed on from the previous battle. Because I had failed to break through the US Division's 2nd Brigade (which was given the mission of delaying the Soviet advance in game 1), the 3rd Mech Div's main divisional defensive position was well prepared, with about half the troops dug in ("improved positions" in the A&A rules), and with about twenty hexes of mines laid(!!).
The Soviet 8th Guards Army would be conducting a deliberate assault against this position. Because of the size of the table I could set up at the convention, this was my best chance to date to get my whole Soviet Army on the table. As I've been quite compulsive about collecting my 3mm troops, over the years I have indeed collected the fighting elements (ie. not the logistics or support troops like signals) of a Soviet Combined Arms Army at 1:1. As per the TO&E included in the Air &Armor game we were using, this comprises:
- three Motor Rifle Divisions (39th, 57th and 20th Guards Motor Rifle Division). Each with 2x MR Regiments (BTR-60 or 70) of 9x companies, 1x MR Regiment (BMP) of 9x companies, and 1x Tank Regiment (T-72s or T-64s), Divisional Tank Battalion (5x companies of T-64), Artillery Regiment (3x 2S3 152mm SP Gun Battalions), BM-21 122mm MRL Battalion, ATGW Battalion (3x companies of BRDM-2 with AT-5), and Engineer Battalion (4x companies in BTR50). Forward and Main Divisional HQs are also represented, including the Divisional AA Battalion dispersed between these.
- a tank Division (79th Guards Tank Division) of 3x Tank Regiments (T-80) and a MR Regiment (BMP), along with Artillery Regiment, MRL Battalion, Engineer Battalion, ATGW Battalion and Div HQs all as above.
- 8th Guards Army Artillery (a regiment of M-1952 240mm Mortars, regiment of BM-27 240mm MRL, three regiments of M-46 towed 130mm Guns, and a regiment of D-20 Towed 152mm Howitzers)
- Additionally, the Soviets had been allocated (by the Front commander): the Southeast German Front Air Assault Brigade (two battalions each of dismounted Parachute Infantry and mechanised Parachute Infantry in BMDs), 3x Companies of Mi-24 Hind attack helicopters, and a squadron of Su-27 Ground Attack aircraft (helicopters and aircraft were all single-sortie).
Defending against this, the US 3rd Mechanized Division comprised:
- 1st Brigade with two M-1 tank battalions (8 companies), two M-2 Mechanized Infantry Battalions (8 companies), and an Engineer company
- 2nd Brigade with two M-1 tank battalions (8 companies), an M-2 Mechanized Infantry Battalion (4 companies), and an Engineer company
- 3rd Brigade with an M-1 tank battalion (4 companies), two M-113 Mechanized Infantry Battalions (8 companies), and an Engineer company
- The Divisonal Artillery was slightly depleted and had a battalion of M-110 203mm SP Guns (3 batteries), two battalions of M-109 155mm SP Guns (6 batteries), and an MLRS battalion (8" MRL).
- Additionally the US had a squadron of A-10 ground attack aircraft available every second turn.
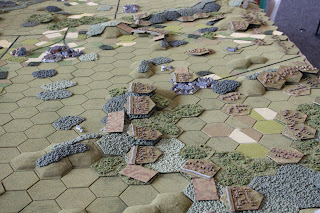
The terrain was again typical western european terrain, with lots of hills, woods, and towns. A view of the overall battlefield (looking down the table - Soviets attacking from the RHS of the photo) is below.
On the Soviet left flank was a major river, crossable only at a major bridge through a large town:
On the Soviet right flank, the terrain was very heavily wooded, effectively closing it down to all but the most determined and slow movement:
The centre had several ridgelines, towns and areas of woods. Additionally, the US position had several ridges suitable for defence (probably why they chose this area).
The Soviets were coming from this side of the table:
The US commanders (Ray, Chris, and Jason) had to set up on this side of the table:
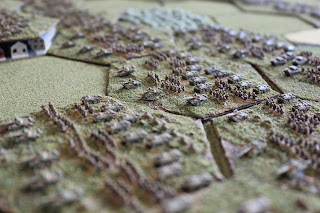
The US C-in-C (Ray) decided to deploy with his three Brigades defending basically in line. The frontage to defend was huge; about 30km of the 36km table (a few kilometres on each of the flanks were 'closed off' by the river and woods on the flanks). The US made good use of his defensive preparations, digging in his forward troops (mostly Mech Infantry) and leaving the tanks to the rear in covered areas, ready to react to threats, cover gaps and to counter-attack against penetrations. Gaps in the line, and the flanks of the forward positions were covered by minefields. The US Artillery were all off-table in support (although we lined them up on the baseline to remind us what was available). The deployment is shown below (rectangular markers are 100mm x 60mm and represent minefields, the coiled wire on the front of bases represents those in improved positions):
I was the Soviet C-in-C, with a simple plan. It was obvious from his layout that Ray expected us to attack into the centre, be held on his strong positions there and then destroyed by his counterattacking tanks. I decided we (the Soviets) would attack instead on the flanks with our first echelon MR Divisions (39th GMRD on the left commanded by me, and 57th GMRD on the right commanded by Pete). As the flanks were relatively weak, this would hopefully force the US to react by shifting troops from the centre, at which time I would spear the two second echelon divisions (20th GMRD and 79th GTD) through the weakened centre. That was the plan.
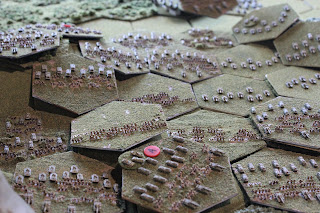
Like the game on day one, the plan started well for the Soviets. We advanced shockingly quickly (for the US) on both flanks. Within two turns (4 hours) we were upon them. Below can be seen the first ecehlon divisions advancing (57th GMRD foreground, 39th GMRD in the background).
View fron the opposite end of the table of 39th GMRD advancing (the red counters are the Soviet order markers - one per regiment):
Soviet MR troops are shown advancing below:
This is probably an opportune time to explain the basing and organisation of the miniatures. At this high level, with company-to-a-base representation, the infantry are based along with their APCs on the same base, as well as the tank platoon (T-62s) that are usually allocated down from each MR Regiment's tank battalion to accompany each company. (You may have noticed in the organisation explained earlier that the MRRs don't have discreet tank companies in them - this is because they are allocated to, and factored into, the infantry stands). Also on the bases are elements of battalion-level support platoons, by Soviet doctrine also usually broken down and allocated to the companies. Each of my companies has the company SAM squad (SA-7) represented, as well as a squad of AGLs (2x AGS-17), and a squad of AT (2x Sagger or Spigot ATGWs or SPG-9 RCL, as appropriate) allocated from battalion level. Additionally, every third company includes the battalion's mortar platoon (6x 120mm mortars) based on the back of the stand - this particular base also doubles as the battalion HQ stand (not required in A&A, but I've made allowance for later, in case I switch to other games like Modern Spearhead, Cold War Commander, or Lightning War that require a battalion level HQ).
On top of these elemets above that I do represent on the bases with miniatures, there are some that I don't represent with miniatures. The A&A rules also factor other commonly allocated support elements into the company fighting strengths. For example for the Soviets, this includes a couple of SP Artillery guns (2S1 122mm SP) and some ATGW (BRDM-2 with AT-4) from regimental level. Hence regimental level AT, AA and Artillery elements are not represented in the game. I like this as it keeps things simple, but still represents the
effects of these elements by rolling them into the strengths of the main (supported)fighting units. I don't include the miniatures for these elements on the bases, however, as most other rules separate these out into separate units, and I want to leave myself the flexibility to represent these as separate units later if I play these other rules. The US and other NATO formations in A&A also have similar abstractions of battalion and brigade support elements (eg. US Mech infantry companies include some of the battalion mortars, some of the ATGW, AA, etc).
The US extreme left flank was particularly weak, being defended only by two mech companies of the 2nd Brigade (dug in, however). So 39th GMRD hit the US left flank first, atacking aggressively against these companies and driving them back with a Regimental hasty attack. Below is the view from the perspective of the poor US combat team commander, facing the brunt of a Divisional attack!:
The US commander on this flank (Jason) could see what was unfolding and had already started to re-align his troops. He moved reinforcing troops in, and was well supported in this by Ray as the Div commander, who reacted with a full Tank Battalion (4x M1 companies) up over a wooded ridgeline for a particularly devestating counter-attack into the flank of the attacking MR Regiments.
Ray (foreground) and Jason are shown below, looking relaxed considering what they're facing!:
A US tank company and an M2 Mech Infantry company is shown below:
Below is the US troops reacting to the attack by 39th GMRD and moving into position.
And then counter-attacking into the flank (the Soviets are hit in the flank initially, top picture, then try to turn and defend, bottom):
The result of this was a virtual massacre of the lead MR regiment of the division and a stalling of the attack. The following turn, the Soviets attacked again before the companies that had been driven back could resume their positions (the CT that was the original target of the attack). I attacked with the BMP regiment (hasty attack) supported by all three Mi-24s, killing the US combat team, but losing the majority of the regiment again to the counter-attacking US M1's still on the flank.
Unfortunately, with two of my four regiments on this axis now 'shattered', the US had held on this flank. I withdrew my shattered regiments, pushed my tank Regiment and remaining MR regiment up to threaten and hold the US troops in place, and waited for the attack of the Second Echelon Divisions in the centre.
Some other troop stands are below. Firstly the Div HQ of 39 GMRD is in the centre of this picture(including Div AA). Div HQs need to remain relatively close to the front line to exert command & control (they have a command range in the rules), as well as provide AA coverage for their units (they are the only bases with significant AA capability). The Divisonal Artillery regiments can be seen to the rear of the HQ:
The Div ATGW Battalion (the tail-end of the Div Tank Battalion is in front of them):
Meanwhile, while I had been initially successful and then ground to a halt, on the Soviet right, comrade commander Pete had done very well (seen below launching 57th GMRD into the attack).
Pete was facing heavier opposition on his flank and had therefore taken his advance a bit more cautiously. 57 GMRD is seen advancing below:
He opted to move his regiments up and conduct
Assaults against the US positions (as opposed to the
hasty attacks I was conducting on the other flank). What this means under the A&A rules is that his troops moved slower, but he was able to coordinate (ie. include) the Army-level artillery to support his attacks. This (understandably) had a devastating effect on the poor defending US battalions. He also supported his attacks with his Divisional engineers to minimise the effects of the US protective minefields (seen below, dismounted and in BTR-50s). Minefields in the rules were treated very simply, but are pretty brutal. Any base moving through them rolls a die (d6) and is destroyed on a result of '1' or '2' (ie. a 33% likely casualty rate!). If engineers accompany the attack, casulaties only result on a '1', so are reduced to 16% - still pretty nasty, but much more acceptable:
With a regiment attacking, supported by Army-level artillery, the lead US Battalions of the 3rd Brigade were either destroyed or forced to withdraw. Below is shown the lead regiment of 57 GMRD penetrating the US positions. First, a battalion of the regiment infilrates into the woods between the two US positions. The remainder of the regiment masses in front for the attack next turn:
The initial attack failed to break through.
But then the subsequent Regimental Assault, supported by Army artillery and an Su-27 squadron overwhelmed the position. The two defending companies of M113 infantry died horribly...
A follow up assault next turn against the US position further in towards the centre also drove that position back from its entrenchments:
It looked like a rout was on the cards on the US left flank, however the US commanders (Chris & Ray) reformed their troops and reinforced them with tank reserves, re-forming a pretty solid second line on the woods line to the rear of the original positions. Moving through the woods (left and bottom of picture) was a viable option for the Soviet Infantry, but would be very slow. Attacking across the open into the US tank positions (in cover) would be a very tough (suicidal?) prospect. So again, after initial success, a bit of a stalemate existed:
The focus now switched to the centre of the battlefield. In the centre, the US troops held the woods and towns. They were not actually attacked but were now threatened by the 57th GMRD's Tank regiment, which swung up behind the MR regiments (now consolidating on the positions they had taken) and moved up to prevent the redeployment of US troops to the collapsing flank. In particular, the US still had a significant number of tanks (from the 1st Brigade) in the centre.
Due to time constraints, we didn't end up bringing on the Soviet second echelon divisions. So my desire to get all my troops on one table at once was not realised. Maybe next time?
But we talked through what we thought was likely to happen, based on what we had already witnessed of the game to date. We agreed it was possible, perhaps even likely, that the Soviets could break through in the centre:
The Soviets had a fast approach-march axis using roads running up through the centre.
The US forces had been battered already, and some of the forces initially deployed to defend the centre had deployed to the hard-pressed flanks. It would take them time to move back into position (even if they could risk it - there were still strong Soviet forces on the 57th GMRD flank in particular).
The force ratio in the centre was likely to be pretty good for the soviets. Whilst the Soviets had so far attacked with a Division against a Brigade on each flank (about 3:1 ratio), in the centre they would now attack with two divisions against a brigade (about 6:1 ratio).
Additionally, the terrain in the centre was more open than on the flanks, and more suitable for tank formations. And one of the Soviet Divisions was a full Tank Division.
It would have been a tough fight (again), but the Soviets should have been able to carry the day. Some of our mates at the convention (playing other games) thought the US had been hard-done-by in the scenario, as I hadn't given them enough air power (the common view was the US would make up for lack of numbers through air-superiority). My counter argument was simply that I had also limited the Soviet's capability by denying use of Chemical weapons, which (in my view) they would almost certainly have used at the time (their doctrine and equipment was all geared towards fighting in the Chemical environment). Both of these topics (US airpower and likelihood of Soviet use of Chemical weapons in the Cold War) could be the subject of many long discussions, so I'll save them for another time.
In wrapping up my Cancon spiel, suffice to say the game was great fun. A number of people participated, and plenty of spectators asked questions and commented on the game. Common discussion was on the miniatures and terrain, how good the game looked, and how effectively and easily the rules handled play with such large formations. So I consider that I achieved my aim of showcasing 3mm miniatures at Australia's biggest games convention.
I'm hoping to play many more games, now that the majority of my miniatures, and in particular my terrain, are finished. So keep an eye out for some more battle-reports.
My other plans now are to start work on my 3mm WW2 stuff, andfinish off some of the other nations I have been waiting to paint up. I've already got a Brigade of Cold War Germans and UK to throw into some scenarios. Then I also have Israelis to finish (my existing Soviets will double as Arab forces) and lots of Swedish stuff to do the Northern front.
My other project will be to finalise the fictional invasion of Australia (by a Soviet styled 'Red' force), and the troops to go along with it. Luckily, O8 already produce the majority of troops I need for the Australian Army ORBAT - including Bushmaster IMV, LAV-25 (for ASLAV), M1A1, M113, Tiger Helicopter etc. More to follow : )


